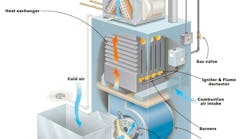


The ability to move air rapidly and efficiently in HVAC systems is essential to achieving a cost-efficient comfort system. The electrical motors that were used in HVAC applications were AC induction style motors that were either single-or multi-speed — they'd run at one speed for heating, another for cooling, and sometimes a third speed for two-stage systems.
The problem with these types of motors is that they use a lot of energy because they run at full amp draw at all times — even during off-demand cycles. Also, since the motors run on high speed all the time, the noise levels are also high.
To address these two concerns — efficiency and noise — the electronically commutated motor (ECM) was developed. According to GE, an innovator in ECM technology, the wide range of the ECM motor, high efficiency, and programmability gives it a virtually unlimited range of performance characteristics.
Of course, the increasing popularity of the ECM motor has led to a number of questions from technicians on how to service and troubleshoot ECM-driven systems.
GE offers a few basic checks that technicians should perform before troubleshooting the ECM motor. One thing to always keep in mind, however, is to always consult the manufacturer's guide to confirm proper configurations and demands.
- Verify that the correct thermostat input voltage is present at the interface of the main control board on the furnace or air handler. Loose or broken low-voltage wires can potentially cause intermittent problems.
- When checking low-voltage connections, always use the C terminal on the board, never on the ground.
- Check the setting of the jumper pins or DIP switches on the manufacturer's control board. Don't assume they are correct; use the manufacturer's guide to select the proper airflow, delays, and profiles. And, be sure to always disconnect the main power to the unit when making these adjustments.
- Check all terminal/plug connections both at the HVAC system control board, and at the motor. Look for loose plugs and/or loose pin connections in the plug, and for burnt, bent or loose pins or seats.
- Confirm there are no limits, rollouts, or safeties tripped. Also check for any fault codes present on the control boards. If fault codes are present, consult the manufacturer's recommendations to resolve the problem.
If these checks don't resolve the problem, or if the fault code reveals a motor problem, then it's time for some additional diagnostics.
For most models of ECM motors, it is normal for the motor to rock back and forth on start up. If this is the only symptom identified, there is no need to replace the motor.
However, if the system is excessively noisy, doesn't appear to change speeds in response to a demand for heat or cooling, or is having symptoms during the cycle such as a tripping limit or freezing coil, there are a number of checks that can be performed.
Wait for programmed delays to time out. If delays are too long, then reset them using the manufacturer's chart.
Ensure the airflow settings are correct for the installed system using the charts. Remember that the change in airflow between continuous-fan speed and low stages of operation may be very slight depending on the size of the system. If the system is operating normally in each stage, then there is no problem.
Remove the filter and check that all of the dampers, registers, and grills are open and free-flowing. If removing the filter corrects the problem, clean or replace with a less restrictive filter.
Also, check and clean the blower wheel, secondary heat exchanger, and evaporator coil. If this doesn't correct the problem, then check the external static pressure. If it's higher than the manufacturer's recommendations, then correct the airflow restriction.If the motor does not shut off at the end of the cycle, check the delay times and wait for delays to time out. Make sure that there is no call for "continuous fan" on the G terminal. This motor may take a while to come to a complete stop with selected delays and the normal ramp down.
There are also a few checks you can perform if the ECM motor is not running. First, check for proper high-voltage and ground at the five-pin connector at the motor. Correct any voltage issues before proceeding.
ECM motors are dual voltage motors capable of operating in 120 or 240VAC systems. On the 120VAC systems, there should be a jumper between terminals one and two. On 240VAC systems, the jumper should be removed. If the motor is operating at 240VAC with the jumper in place, the motor will be permanently damaged.
ECM Service Tech TipsTech Tip 1: Don't automatically assume the ECM motor has failed. Make sure you go through the diagnostic steps completely before replacing the motor. Tech Tip 2: When it's necessary to disconnect the power from the HVAC system, it's always a good practice to verify that voltage has been disconnected, by using a voltmeter. Tech Tip 3: A True-RMS meter isn't needed to check high-or low-voltage to the motor. Tech Tip 4: If you must replace the 2.0, 2.3, or 2.5 control module, then be sure to use a direct replacement from the manufacturer. ECM control modules are factory programmed for specific manufacturer applications. If you use the wrong control module, it will void all product warranties and may result in improper or no blower operation. Tech Tip 5: If a check of the control module indicates replacement is required, then also check the motor module. Installing a new control on a failed motor will result in the new control also failing. Tech Tip 6: Always pull the connector and not the wires. Most connectors are also keyed. Reconnecting a connector the wrong way could damage the motor. Tech Tip 7: When checking any plug connector, the meter leads are most likely larger than the terminals or socket. Using thin leads will prevent the terminals from being damaged by a voltage check. |