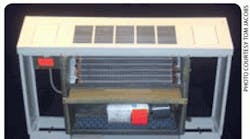
Fan coil units have basically three major components to check at regular service intervals: the motor, the filter, and the coil itself. Of course, doing a great maintenance on a fan coil unit means going a little deeper, but the extra effort is always worth it.
First of all, be aware that every fan coil unit has its own unique operating environment, which may dictate a unique maintenance schedule. A formal schedule of regular maintenance and an individual unit log should be established and maintained to extract the maximum performance and service life from each unit.
And, as always, before doing any inspection or maintenance on an electronic unit, turn the equipment off and lock out the power source before beginning your work.
Direct Drive Motor /Blower Maintenance
The type of fan operation is determined by the control components and their method of wiring, and may vary from unit to unit. Refer to the wiring diagram that’s attached to each unit for that unit’s operating characteristics.
Lubricate. Motors equipped with oiler tubes may be lubricated with a 20-weight non-detergent oil. The frequency of the lubrication is dependent upon the operating conditions of the motor. Units subject to frequent fan cycling, or those that operate in a dirty environment, require more attention than those subject to less severe operation. Motors should be lubricated at least once per year. Some motor designs don’t require field lubrication. Keep in mind that over-oiling has been shown to reduce motor life.
Possible replacement. Should the motor/blower assembly require more extensive service than simply lubrication, the assembly may be removed from the unit to facilitate such operations as motor or blower wheel/housing replacement.
Dust control. Don’t allow dirt and dust to accumulate on the blower wheel or housing. This can result in an unbalanced blower wheel condition that can damage a blower wheel or motor. The wheel and housing may be cleaned periodically using a vacuum cleaner and brush, taking care not to dislodge the factory balancing weights on the blower wheel blades.
Watch voltage. When replacing motors, be sure to verify that the motor voltage, phase, and horsepower are correct for the unit being installed.
Belt-drive Motor/ Blower Maintenance
Recommended periodic maintenance of the belt drive unit/blower assembly is lubrication of the motor (if required) and inspection of the drive belt for wear and tension. The blower hub set screws, sheave and bearing locking collar set screws must be checked periodically, and tightened and torqued as required.
Leave bearings alone. The blower shaft bearings are usually permanently sealed and lubricated ball bearings, and no attempt should be made to disassemble or lubricate these bearings.
As with a direct-drive motor, dirt and dust shouldn’t be allowed to accumulate on the blower wheel or housing.
Greasing tips. Factory motors without regreasing capability are lubricated by the motor manufacturer for normal bearing life. Refer to the motor manufacturer’s instruction tag for additional information. In motors equipped with grease fittings, clean the tip of the fitting and apply the grease gun. Use one to two full strokes on motors in NEMA 215 frames and smaller, and two to three full strokes on NEMA 254 or 256 frame motors.
On motors that have drain plugs, remove the drain plug and operate the motor for 20 minutes before replacing the drain plug. Be sure to wipe up any excess/purged grease.
V-belt Installation & Replacement
When your inspection uncovers a belt that’s dried out, cracked, or simply has reached replacement time on the maintenance schedule, change it carefully. This is a simple and familiar procedure, but doing it in a haphazard way can cause big problems in a short time.
- Loosen the motor mount and shorten the distance between the sheaves. This allows old belts to be removed easily and new ones to be installed without damage.
- Inspect and service the drive elements. Inspect and replace damaged parts, including worn bearings and bent shafts.
- Inspect and clean the sheaves, and replace any that are worn or damaged. Worn sheave grooves are one of the key causes of premature belt failure.
- Clean dirty, dusty, or rusty sheaves. They will impair the drive’s efficiency and wear out the belt cover. Feel the sheave grooves (wear gloves or use a rag) for nicks or burrs, and file them smooth.
- Most belts ride in the blower sheave groove(s) so that the top of the belt is just above the highest point in the sheave. Be aware that if the grooves are worn to the point where the belt bottoms out (check for shiny groove bottoms), the belt will slip and burn. Grooved separators can become “dished out” — that is, when belts ride tightly within grooved separators, the seperators start to wear down and the belt can start to slide, and will either break or fray. Check groove wear by sight, touch, or with a sheave gauge. If the grooves are dished out 1/32-in. or more, replace the sheaves.
- Check and correct the sheave alignment. Misaligned sheaves will accelerate wear of belt sidewalls, which will shorten both belt and sheave life. Misalignment can also cause belts to roll over in the sheave, or throw the load to one side of the belt, which can break or stretch the tensile cord. Check for correct alignment by placing a steel straight edge across the sheave faces.
- Select replacement belts carefully. Don’t mix old and new belts on a drive, don’t mix belts from different manufacturers, and always use belts of the correct type and cross section.
When tensioning the belts, remember that the key to long, efficient, trouble-free belt operation is proper tension. Follow this tensioning guideline: the proper tension for a V-belt is the lowest tension at which the belt won’t slip or squeal under peak load.
Page 2 of 2
To tension belts, adjust the center distance until the belt appears fairly taut. When struck with your hand, properly tensioned belts will bounce back with a springy motion. Run the drive for about 15 minutes to seat the belts, then apply full load. If the belts slip or squeal, apply more tension. When the drive is in motion, a slight sag on the slack side is normal.
Coil Maintenance
Coils on most fan coil units can be cleaned by removing the motor/blower assemblies and brushing the entire air face between fins with a stiff brush. Brushing should be followed by a thorough vacuuming. If a compressed air source is available, the coil may also be cleaned by blowing air through the coil fins from the exiting air face. Keep in mind that units with the proper type of air filters, replaced regularly, will require less frequent coil cleaning. Which brings us to filter maintenance.
Filter Maintenance
On units with throwaway filters, the time interval between each replacement should be established based on regular inspection of the filter, and should be recorded in the log for each unit. Filters should be the same type and size as those furnished from or recommended by the factory. Pleated media or extended surface filters should generally not be used, because the high air pressure drops encountered with these types of filters is often not compatible with fan coil units.
On units with permanent filters, a maintenance schedule should be developed in the same manner as for throwaway filters. Factory installed permanent filters may be cleaned in hot soapy water, set on edge to dry, and then reinstalled in the unit.
Before replacing a permanent filter in a unit, recharge it with an entrapment oil or film. Spray both sides of the coil, or submerge it in the film, to ensure complete coverage. Don’t allow the filter to soak in the film; remove it immediately and drain the excess film from the filter before reinstalling it in the unit.
Permanent filters typically create less static pressure loss than throwaway filters. When replacing a throwaway filter with a permanent one, check the fan motor amperage to ensure that the motor hasn’t been placed in an overload condition. It may be necessary to reduce the fan driven speed or rebalance the system.
Drain Maintenance
Check the drain at the beginning of each cooling season to ensure that the drain trap and line are clear. If they’re clogged, clear any debris so that condensate will flow easily.
Check the drain periodically during the cooling season. Units equipped with a secondary or “tell tale” drain connection will indicate a clogged main drain by flow from the tell tale connection.
Check with your local supply houses for a chemical available to control algae or bacteria in drain pans.
Electrical Wiring and Controls
The electrical operation of each unit is determined by the components and wiring of the unit, and may vary from unit to unit. Consult the wiring diagram attached to the unit for the type and number of controls provided on each unit.
Inspect all wiring connections and controls regularly for proper operation. Don’t forget the wall thermostats. These may also become clogged with dust and lint, and should be periodically inspected and cleaned.
When replacing any components such as fuses, contactors, or relays, use only the exact size, type, and voltage component as furnished from the factory. Any deviation without factory authorization could result in personal injury, or could damage the unit and void the factory warranty. Be sure to perform all electrical repair work in such a manner as to maintain the equipment in compliance with governing codes or ordinances, or testing agency listings.
Tom Jacobs is president of USA Coil and Air, Malvern, PA. The company manufactures standard and custom commercial and industrial air conditioning and heating equipment He can be reached at 800/872-2645, or by e-mail at [email protected].


