When it comes to measuring economizer airflow there are two distinct groups; the believers and non-believers. The believers have studied, practiced, and effectively measured economizer airflow. The non-believers simply claim it can’t be done, offer no solution, and end the discussion. Let’s take a look at economizer airflow measurement and how you can accurately measure it in the field. Somebody’s got to do it.
A Thousand Times a Day
Since nearly every commercial HVAC system moving over 2,000 cfm is required by code to provide outside air, somebody must measure economizer airflow. Architects and engineers specify economizer airflow and require it to be set and certified by an air balancer. Many mechanical contractors are also certified to set outside air. Code also requires outside air to be set by a qualified individual.
It is estimated that 249,000 commercial systems are shipped annually in the U.S. (AHRI Shipment data, October 2015). If you do the math, that’s more than 780 units replaced per day. Since code requires economizer airflow volume to be set, it’s clear this test is in demand. Due to indoor air quality, several states require that fresh air volumes be certified annually. Clearly, the need to accurately measure economizer airflow exists.
An increasing number of service companies are finding new opportunities by adding economizer services to existing maintenance agreements. It is claimed that over 80% of economizers are found to be non-functional. What these service companies are finding is a new vein of gold hidden in their existing service inventory.
Required Test Instruments
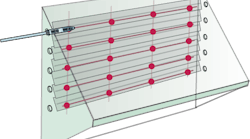
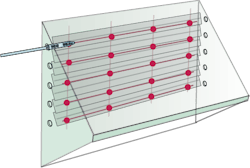
Due to the limited access caused by most economizer assemblies, the method of choice is to use a velocity grid accessory coupled with a programmable manometer to quickly and accurately measure air volume at the inlet of an economizer eyebrow. A rotating vane anemometer may also be used to perform a multi-point traverse.
When windy conditions exist, use a hot-wire programmable anemometer inserted through test ports installed in the side of the economizer eyebrow adjacent to the fresh air inlet of the equipment. Instruments must meet calibration and minimum accuracy requirements.
An additional requirement is the technician must be trained, capable, and able to capture repeatable airflow readings. This skill requires study and practice, a step in effective airflow measurement the non-believers have failed to take.
Airflow Test Method
The test method followed to measure economizer airflow is the traverse found in ASHRAE Standard 111. What is often absent from most economizer field or laboratory testing is the 10 duct diameters. Any experienced air-balance technician is aware that accurate airflow measurements can be taken under less than ideal field conditions. Naysayers claim a velocity array must be used to interpret airflow under these conditions. This is a fallacy that attests to a lack of experience and skill to field measure airflow. In principle, it is the same test.
Preparation
If airflow is to be measured at the economizer inlet, measure the area of the eyebrow and calculate area of the inlet in square inches. Divide this value by 144 to convert the area to square feet. You will use this to calculate Cubic Feet per Minute (cfm). You may also program these dimensions into most test instruments.
If conditions are windy, drill a series of test holes, as required by ASHRAE 111, spacing to traverse the airflow inside the eyebrow where it enters the equipment. Measure the air inlet into the equipment converting to square feet. You will need to mark your anemometer probe with stops at the required traverse points to increase accuracy.
Inspect the economizer inside and out to verify controls and louvers are functional, the economizer wiring harness is actually connected to the equipment, and the louvers and motors are in good shape. Inspect any air filter or screen and assure it is clean and intact.
Initially set the economizer return air louvers and the economizer louvers to move the required airflow. Only experience can teach you how and where to set the louvers. Your ability to estimate required louver position will increase with each test.
Hint: the volume of airflow moving through the louvers is driven by pressure. A static pressure measurement will add volumes of wisdom to your initial estimated louver position. For starters, you may begin with a ½” to ¾ “ gap between the louvers for most minimum starting louver positions.
Note: The volume of airflow cannot be estimated based on the number of fingers that fit between the louvers. This is, by the way, the specified economizer airflow test method used by non-believers.
Make sure the air distribution system has been balanced before creating and marking the final economizer minimum air position. Remember, a change in economizer airflow will change other airflows in the system. This is why you’ll perform an initial set-up of an economizer before air balancing and a final during the completion of air balancing.
Start-up the system fan(s) and allow the system to stabilize.
Airflow Test Method
With your measurements taken, your test ports prepared, and the system started, it is time to measure airflow.
Step One - While inserting your test instrument or probe at 90 degrees to the airstream, take airflow readings in a grid pattern back and forth across the airstream. Record the air velocity measurements at each test point, or allow your test instrument to capture the readings.
Step Two – Add together each of the velocity readings and divide by the number of readings taken to find the average airstream velocity.
Step Three – Multiply the average airstream velocity times the area of the opening in square feet. The answer is the economizer airflow.
Step Four – Make appropriate louver adjustments and re-measure economizer airflow in the same manner. Take a building pressure reading and adjust the return air dampers accordingly.
Step Five – When the required airflow is obtained, record your final readings, lock down and mark louver position. Jumper or run the economizer controls through a cycle or two to verify adequate functionality and free louver movement.
Step Six – Place the louvers in the maximum airflow position, assuring the return dampers respond properly as well. Then traverse and record the maximum economizer airflow.
Step Seven – With the louvers in maximum position, the airflow through the system fan(s) is normally maximized. Measure fan motor amperage and compare the rated full load amps to assure the motor is not exceeding maximum rated amperage.
Step Eight – Review and adjust the control system to assure appropriate set points during occupied and unoccupied hours of operation. Finally, return the controls and the system to their normal operating sequence.
Follow the steps offered in this article, and then pay the price of admission into the believers club who know how to accurately measure and adjust economizer airflow.
Rob “Doc” Falke serves the industry as president of National Comfort Institute an HVAC-based training company and membership organization. If you're an HVAC contractor or technician interested in a free economizer airflow test procedure and a report form, contact Doc at [email protected] or call him at 800-633-7058. Go to NCI’s website at nationalcomfortinstitute.com for free information, articles and downloads.
