When customers describe a lack of comfort, one problem may be a new or long-standing duct restriction. Let’s take a look at two five-minute tests that let you “see” the location of a duct restriction and determine a solution.
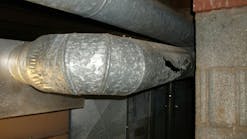
Since your mission with this diagnostic test is to discover airflow restrictions in a duct, static pressure is the easiest and best test to get the job done. Duct restrictions are typically caused by undersized ducts, poor installation, damaged, kinked, or crushed duct. Some restrictions may be as simple to repair as opening a closed damper.
As the airstream moves past an obstruction in a duct, the restriction creates back pressure between the restriction and the fan. This back pressure is measured as static pressure and will identify if the restriction is in the supply or return duct.
How to Measure Duct System Static Pressure
First, you’ll need the right tools and accessories to test duct system pressures. You’ll need the following:
- A cordless drill and 3/8” drill bit to install test ports (access holes) into the duct
- A dual-port manometer (0-5” w.c. for digital manometers and 0-1” w.c. for analog meters)
- A static pressure tip to insert into the airstream
- Tubing to carry pressure from the static pressure tip to the manometer.
Follow these steps to measure duct pressure:
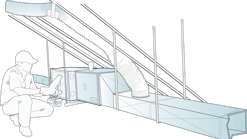
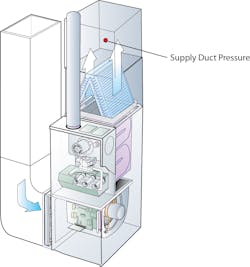
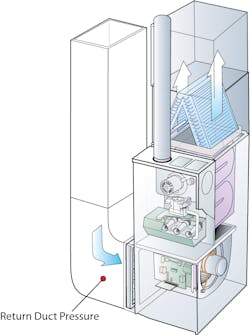
1. Install test ports (access holes) into the duct at the locations shown in the illustrations below.
2. Connect one end of the tubing to the manometer and the other end to the static pressure tip.
3. Assure the manometer reads zero pressure before inserting the static pressure tip into the duct. Analog manometers must be level to read accurately.
4. Insert the static pressure probe into the duct with the pointed tip facing into the airstream.
5. Read and record the duct pressure.
6. Interpret the pressure reading using duct system pressure budgets described below.
Then inspect the duct system size and installation conditions to further diagnose the restriction. Finally, prescribe a solution to your customer. If agreeable, make the repair. When completed, test the duct pressure again to assure you achieved the desired outcome.
Remember, static pressure is highest near the fan and lowest near the registers and grilles. This principle will come in handy when you test.
Supply Duct Pressure
An HVAC system usually has two duct systems: A supply and a return.
NCI has documented the approximate pressure of well-performing supply and return ducts and found that an acceptable duct pressure typically measures less than 20% of the equipment’s maximum rated total external static pressure (TESP).
Example: If the equipment nameplate shows the fan is rated at .50” w.c.; multiply .50” x .20 (20%) to determine a duct pressure budget of .10” w.c.
To measure supply duct pressure, install the test port in the location indicated in the illustration above. If the system has an external coil, install the test port after the coil. If there is no coil, install the test port approximately one or two feet after the fan discharge.
Connect the pressure tubing to the positive port (+) of the manometer and the static pressure probe on the other end of the tubing. Insert the static pressure tip into the duct with the tip facing into the air stream. Read and interpret the supply duct pressure.
Compare the measured supply duct pressure to the supply duct pressure budget. If the measured pressure exceeds the budget by more than 10% the supply duct has some form of restriction. Inspect for undersized, damaged, or pinched duct and prescribe a repair to your customer.
Return Duct Pressure
The steps for measuring return duct pressure are very similar to measuring supply duct pressure.
On the return duct system, install the test port where air enters the air-moving equipment, see the illustration below if the air filter is located at the equipment.
If the system has a return air filter grille, an additional measurement needs to be taken just after the filter. Subtract that pressure from the return duct pressure measurement to find the return duct pressure.
Connect the pressure tubing to the negative (-) port of the manometer and insert the static pressure probe with the tip facing into the airstream, away from the equipment.
Read and interpret the return duct pressure by comparing the measured return duct pressure to the return duct pressure budget. This budget is the same as the supply duct pressure budget.
If the measured pressure exceeds the budget by more than 10%, inspect for undersized return duct, restrictive grilles, duct blockage, damaged or pinched duct. Then prescribe the appropriate repair to your customer.
If the system you are testing has a return duct with very little restriction, perhaps only half of what it should be, the supply duct pressure can be one and a half times of what it should be. You can apply any unused pressure on the return duct to the supply duct.
Additional Static Pressure Diagnostics
Further static pressure diagnostics are often needed in addition to duct static pressure testing. Total external static pressure is the initial test that tells the whole story, but that’s another article. Email me for a total external static pressure test procedure.
My next HotMail article will discuss how to find a hidden restriction within a duct using more specific static pressure diagnostics.
Many of you remember the day when we thought our job was to fix equipment problems. With experience, HVAC professionals soon learn the answer to solving many equipment problems is fixing the duct system.
Rob “Doc” Falke serves the industry as president of National Comfort Institute, Inc., an HVAC-based training company and membership organization. If you're an HVAC contractor or technician interested in the free total external static pressure procedure referred to in the article, contact Doc at [email protected] or call him at 800-633-7058. Go to NCI’s website at nationalcomfortinstitute.com for free information, articles, and downloads.


