You suspect a coil is dirty and needs cleaning, but you’re not quite sure if your diagnosis is correct. Let’s take a look at a five-minute test you can perform to be certain.
Inspection Not Enough
If you’re any good at your job, you want to be certain your diagnosis is correct before you act or make a recommendation to your customer. This test gives you the assurance you need so you can recommend coil cleaning with confidence.
Many residential cooling coils are difficult to inspect. First, removing a couple screws and opening access panels is not possible in some applications. In commercial equipment you may have better access, but coils are deeper, and a visual inspection may not tell the whole story.
Second, if you can see the coil, a visual inspection will only reveal the surface muck. The same principle holds true for an inspection camera. If grime is imbedded within the coil, it may not be visible from the surface.
Hopefully, I’ve placed enough doubt in your mind to move you to test before recommending coil cleaning.
What Am I Testing For?
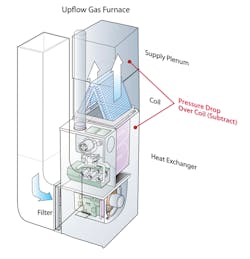
This five-minute test measures the static pressure drop across the coil. As airflow moves through a coil, it creates resistance that you can measure. A dirty coil has more airflow resistance than a clean coil.
For example, a new, clean, residential three-ton cooling coil is rated by the manufacturer to have a pressure drop of .30” w.c. at 1200 cfm.
If you measure coil pressure drop and its .50”, you know the coil is dirty and must be cleaned.
How to Perform the Test
First, you’ll need the right test instrument and accessories. These kits are available throughout the industry and they cost as little as $200.
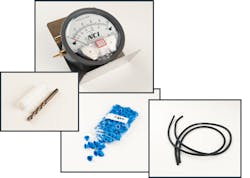
The instrument and tools you’ll need include:
- A low-pressure manometer (to measure air pressure). Its range should be 0 to 1-in. w.c. on an analog gauge. Or, 0 to 5-in. on a digital gauge. It must have a positive and negative pressure port. Be sure to get the case with the manometer.
- Static pressure tip. This is different than a Pitot tube. It collects the static pressure from the airstream, through the tube and into the manometer.
- Pressure tubing matching the ports on the manometer and the static pressure tip. I like mine at least four-feet long.
- A 3/8-in. drill bit with a sheath to prevent the drill bit from penetrating the coil (If you do, that’ll mess up your day).
- Test port plugs to stop air leakage from the test port after the test.
Here are the steps to measure static pressure drop over a coil
1. Start the equipment and allow the fan and airflow to stabilize.
2. Inspect the coil, equipment and duct to find a safe location to install test ports.
3. Install test ports by drilling holes into the airstream a couple inches before air enters the coil and another after air exits the coil.
4. Connect the pressure tubing to the positive port of the manometer and to the static pressure tip.
5. Turn on and zero the manometer.
6. Insert the static pressure tip into the test port, always facing into the airstream, before the coil. Read and record the pressure. Say its .56”.
7. Then insert the static pressure tip into the test port after the coil. Read and record the pressure. Say its .08”.
8. Subtract the two pressures (.56” - .07” = .49”) to find coil pressure drop is .49”.
9. Determine the manufacturer specified coil pressure drop. In this example, let’s say it is .32”.
10. Compare the measured coil pressure drop of .49” to the specified pressure drop of .32” (.49”-.32” =.17”) to discover the coil pressure drop is .17” higher than it should be. That’s a 153% (.49”/.32” = 153%) increase in the pressure drop over the coil.
11. Confidently recommend a coil cleaning to your customer.
Compare the Pressure Drop
As you can see, the diagnostic is made when you compare the manufacturer specified coil pressure drop to the field measured coil pressure drop. If the pressure drop is more than 15% to 25% higher than the specified pressure drop, odds are good it’s coil cleaning time.
One issue is finding the manufacturer’s coil pressure drop information. Fortunately, you can find this information online. Often, all it takes is entering the coil model number and the word “specifications” into your phone, and the coil specifications will suddenly appear.
When that doesn’t pull up the coil specifications, search the manufacturer website and find the coil specifications to determine the rated coil pressure drop.
The best baseline to compare a coil pressure drop to, is the measured coil pressure drop when the coil is newly installed with the correct airflow verified. Experienced technicians measure coil pressure drop, then write it on the outside of the coil in permanent ink when starting up the system.
Coil Testing Diagnostic Tips
When measuring and comparing coil pressure drop to check cleanliness, a few additional tips will assure an accurate diagnosis.
Wet or dry? There is a difference in pressure drop between a dry and wet coil. As water condenses on the coil, it adds resistance to airflow and coil pressure drop increases. When reading a manufacturer’s specification or comparing to the installed coil pressure drop, note if you took the reference pressure when the coil was wet or dry. This alone can make a 20% difference. The coil specifications list two different coil pressure drops, one while wet and another while dry.
Airflow through the coil? Air has weight. A five-ton system will push more than 5,000 pounds of air per hour through a coil. If airflow through the coil is different than the referenced pressure, this must be considered in your diagnosis. Of course, a plugged coil will decrease system airflow, so this is a principle you’ll use often. The coil specifications lists different coil pressure drops at a variety of airflows.
Frozen? A plugged coil lowers airflow and increases coil pressure drop. A frozen coil looks the same when you see it through your manometer. Be sure to suspect and inspect for coil ice.
What caused the grime build up? Great diagnosticians look beyond the immediate problem to find what caused it. In other words, identify the source of the coil muck. Was it a poor air filter? A return duct leak pulling in cellulose insulation? Is there a big shaggy dog sleeping by the return? Or, was the outside air inlet installed after the filter?
Please learn to measure and interpret coil pressure drop. Keep it ready as a weapon in your diagnostic arsenal and use it regularly. It’s time to take another step higher in your chosen profession.
Rob “Doc” Falke serves the industry as president of National Comfort Institute, Inc., an HVAC-based training company and membership organization. If you're an HVAC contractor or technician interested in a free test procedure describing simple testing you can do on a sales visit, contact Doc at [email protected] or call him at 800-633-7058. Go to NCI’s website at nationalcomfortinstitute.com for free information, articles, and downloads.
About the Author
Rob 'Doc' Falke
President
Rob “Doc” Falke serves the industry as president of National Comfort Institute an HVAC-based training company and membership organization. If you're an HVAC contractor or technician interested in a building pressure measurement procedure, contact Doc at [email protected] or call him at 800-633-7058. Go to NCI’s website at NationalComfortInstitute.com for free information, articles and downloads.


