New equipment startup is the ideal time to assure a system operates properly and performs as it should. In about five minutes, you can document your system's most pristine condition with a static pressure profile. It will serve as a benchmark of your installation and become a valuable diagnostic reference throughout the system's life.
A static pressure profile is four air pressure measurements taken near the equipment. You record each pressure, make some simple calculations, and then compare pressures are to manufacturer specifications. Better technicians write measured pressures directly on the new equipment in permanent ink.
The System's Fingerprint
When you take and record a new system's static pressure profile, it becomes as unique and valuable as a fingerprint. As seasons pass, any variation in the system'sWhen any of the four static pressure readings change, an experienced technician can interpret each change to pinpoint the new problem's cause and resolve it before permanent damage to the system occurs.
Studying the fingerprint changes make many system defects evident that may not be visible by any other means. When you learn to interpret the static pressure fingerprint, you can pinpoint and resolve problems like a surgeon.
Inexpensive Tools
To measure static pressure, you'll need a digital or analog manometer that displays pressure down to a hundredth of an inch of water column (in. w.c.).
You'll also need a 3/8-in. drill bit with a protective sheath to assure the bit doesn't penetrate too far into the equipment. Additional accessories are pressure tubing and a static pressure tip to capture the air pressure readings.
Startup the System
When you set up new equipment, you should inspect the entire system to ensure the installation is complete. Also, make sure to set the required airflow. Start the system at the thermostat and allow the fan to ramp up completely.
When any of the four static pressure readings change, an experienced technician can interpret each change to pinpoint the new problem's cause and resolve it before permanent damage to the system occurs.
Remember, the equipment is new. Your job is to ensure it is installed correctly and operating within manufacturer specifications. The static pressure profile will verify many aspects of your installation's quality.
Where to Take Pressure Readings?
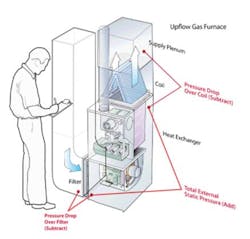
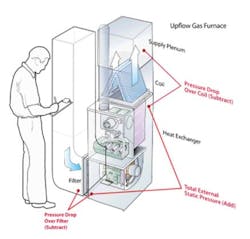
You need to install four test ports in most residential systems to get a static pressure profile. We'll use this residential upflow furnace illustration to understand better where to test.
Before installing any test ports, remove access panels, and carefully inspect to ensure there are no equipment components the drill bit might damage.
Install a 3/8-in. test port (a hole) an inch or so before the air filter and a second test port just after the filter.
Next, install a test port in a safe location just before air enters the coil and another several inches after the coil.
Start the system and allow airflow and pressures to stabilize. Insert the static pressure tip into each test port with the tip facing into the airflow. Then measure and record each of the four pressures.
Do Simple Math
You can calculate the resistance to airflow of many equipment and system components by adding and subtracting different pressure measurements.
First, add the pressures taken after the air filter and before the coil. This reveals the total airflow resistance within the entire system. This pressure is also called total external static pressure or TESP.
Second, subtract the pressure before the air filter from the pressure taken after the air filter. This measurement shows the filter's resistance to airflow and is called filter pressure drop.
Third, subtract the pressure after the coil from the pressure taken before the coil. This calculation indicates the coil's restrictiveness and is known as the coil pressure drop.
Fourth, check the return duct system's design and installation quality by using the pressure taken in the test port just before the air filter.
Fifth, verify the supply duct system's design and installation effectiveness using the pressure taken in the test port just after the coil.
With these pressures and calculations, you're ready to evaluate the installation.
Evaluate the System's Installation
You can compare the measured pressures to manufacturer engineering data and typical industry pressures to evaluate the system's design and installation.
Compare TESP to the maximum rated TESP listed on the air handling equipment's nameplate. If it exceeds the limit, you'll need to make system adjustments so it will perform within published specifications. If pressure is high, you have just discovered that the installation instructions are stuck in the equipment. If pressure is low, there may be significant duct leakage or low airflow.
To evaluate the air filter, compare measured pressure drop to manufacturer specifications. If no data is available, you can compare to an average well-performing system's air filter pressure drop of 20% of maximum rated TESP.
To evaluate the air filter, compare measured pressure drop to manufacturer specifications. If no data is available, you can compare to an average well-performing system's air filter pressure drop of 20% of maximum rated TESP. If it's too restrictive, the fan may not be able to afford that high-efficiency filter.
To assess the coil's resistance to airflow, compare the coil's measured pressure drop to its rated pressure, which you can find in the manufacturer's specifications. If no data is available, you can compare coil pressure drop to the average well-performing system's coil pressure drop of 40% of maximum rated TESP.
Return and supply duct system pressures should not exceed much more than 20% of the fan's rated TESP.
Ongoing Diagnostics
With the system setup verified to operate correctly, take and record each pressure on the equipment itself or on a label designed to capture the readings.
Each time you service the equipment, compare the new pressure readings to pressures taken when the system was new.
Increasing pressures may indicate grime buildup on system components, such as a filter or coil. Rising pressure may also reveal damaged ductwork or perhaps a higher fan-speed setting.
Pressures that are lower than when the system is new may indicate detached ducts, a hole in the filter, a dirty blower, or reduced fan speed.
Remember, whenever you measure a static pressure profile in the future, compare your readings to the pressures recorded at the time of installation. Each change in pressure indicates a difference in system performance. If the difference is more than 10%, the system needs corrections.
Rob "Doc" Falke serves the industry as president of National Comfort Institute, Inc., an HVAC-based training company and membership organization. If you're an HVAC professional interested in a free procedure to measure a static pressure profile, contact Doc at ncilink.com/ContactMe or call him at 800-633-7058. Go to NCI's website at nationalcomfortinstitute.com for free information, articles, downloads, and current training opportunities
About the Author
Rob 'Doc' Falke
President
Rob “Doc” Falke serves the industry as president of National Comfort Institute an HVAC-based training company and membership organization. If you're an HVAC contractor or technician interested in a building pressure measurement procedure, contact Doc at [email protected] or call him at 800-633-7058. Go to NCI’s website at NationalComfortInstitute.com for free information, articles and downloads.

