Variable capacity equipment is one of the greatest advancements in our industry. Unfortunately, there’s a nagging problem plaguing everyone from homeowners to manufacturers. The problem is fan failure and blower errors. Some fault codes happen daily, while others are infrequent. They never had to deal with this new complaint from homeowners before, so many contractors assume it must be the new equipment.
Installing contractors often guess how to fix these problems. Many technicians start by replacing the control board and/or wall-mounted controller, but the problem doesn’t go away. So, they spend hours making random adjustments, hoping something works, usually to no avail.
Our industry is getting a black eye for a long-standing but often overlooked problem that these advanced systems bring to light. Previously installed duct systems and/or air filters don’t work like they’re supposed to, and this new equipment will have no part in it.
Solving fan and blower failure errors doesn’t have to be a guessing game. Let’s look at a systematic approach you can use to test, diagnose, and solve such errors on variable-capacity equipment.
A Static Pressure Kit is Mandatory
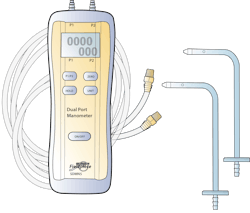
To solve fan failure errors, you need airside measurements. Static pressure testing is an excellent place to start troubleshooting. To measure it, you’ll need some basic gear. Standard test instruments and accessories include:
- A manometer – analog or digital
- Static pressure tips and an inflator needle (for tough test locations)
- Tubing – neoprene or silicone
- 3/8-inch test port plugs
- A drill or impact driver with a step bit and a 3/8-inch drill bit with a stop
- Thin screwdriver – for piercing internal duct liner.
You can assemble a complete kit for less than $250. Each component has a purpose, so don’t leave any out.
Get Your Baseline First
Don’t get too wrapped up in testing before you perform a visual inspection. Since most installations include newer equipment installed on existing duct systems, first look for obvious problems. These include closed dampers or supply registers, blocked return grilles, dirty filters, or improper equipment setup. Fix these problems first, but don’t assume they will solve them.
After eliminating any obvious issues, you must gather essential information about the equipment. This data helps you establish static pressure and airflow targets before measuring. The basic equipment information you need includes:
- Equipment type and location
- Indoor unit model number(s)
- Fan airflow settings
- Maximum rated total external static pressure (TESP) from the indoor nameplate
- Outdoor unit model number
- Outdoor unit tonnage
- Equipment manuals and specifications.
With this information in hand, you’re ready for the next step.
Measure Static Pressure
You typically need four static pressure readings to diagnose a system. To gain access to the system’s airside, you must first install (drill holes) static pressure test ports. The type and location of the air-handling equipment determines where to install these ports. Gas furnaces have different locations than air handlers, so be sure to know the differences.
Once you’ve installed test ports, turn the system to its highest setting and check fan airflow at the controller or count the blinking lights. Is it within ± 10% of the manufacturer’s required airflow? If not, adjust the fan settings to achieve the required airflow. Once fan airflow is within ± 10%, measure:
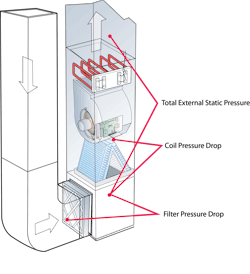
- Total external static pressure (TESP)
- Filter pressure drop (∆p)
- Coil pressure drop (∆p)
- Supply and return duct pressures.
TESP is the first measurement because it provides an overall picture of what’s happening with the system’s airside. If measured TESP exceeds the air handling equipment’s maximum rated TESP, an airflow problem probably exists. Checking pressure drops across the air filter and coil and checking duct pressures help you identify the most restrictive airflow components.
Diagnose Your Static Pressure Readings
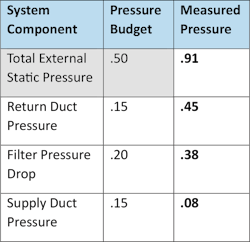
To help you diagnose static pressure readings, National Comfort Institute (NCI) created pressure budgets. This simple troubleshooting tool assigns a percentage of the equipment’s maximum-rated TESP to system components. Here’s an example of how a pressure budget works on an air handler rated at .50 in. w.c. (inches of water column) TESP.
You’ll notice TESP is the baseline for pressure budgets. If you add the others up, they equal .50.
As you diagnose pressure readings, look for numbers exceeding the budgets. They show areas you should focus on. The highest pressures equal the highest restriction to airflow.
Let’s say you take the following pressure measurements in the third column of the table. The first indicator that this system needs duct modifications to solve a fan failure error is the .91 TESP reading. It severely exceeds the .50 maximum rated TESP. However, this measurement doesn’t identify where the problems are. It’s time to dig deeper and look at other pressure measurements to identify the source(s) of the high TESP measurement.
Start with the return duct and work your way towards the supply. Return duct pressure measures .45, and the pressure budget is .15. That’s a lot higher than the budget, so this is an area you would focus on.
As you continue down the table and compare measured pressures to pressure budgets, you’ll see the filter also has a much higher pressure drop than the budget. This is another area that needs further investigation to determine why the reading is so high.
The supply duct pressure measurement is much lower than the budget. That’s a great sign this side of the duct system is acceptable. But beware, because low pressures can also indicate disconnected supply ducts and leaks, so proceed with caution.
You’ll notice the coil pressure drop is missing from this information. Since the indoor coil in most air handlers is internal, there is no pressure budget. If you’re curious about a coil’s pressure drop, you can use a budget of .20 to .30 as a baseline value.
For more information about test locations, measurements, and static pressure budgets, please email me for NCI’s Static Pressure Quick Start Guide.
Pinpoint the Repairs
You can see in the readings above the return duct system and air filter need improvement. So, how do you pinpoint these repairs? Let the pressure readings guide you. Relieve the restrictions starting at the equipment and then work down the trunk ducts and branches towards the supply registers and return grilles.
Undersized and restrictive air filters are a common source of return air issues. One simple solution is to remove an undersized one-inch filter and install a correctly sized media filter. If your customer wants to keep the one-inch filter, install a larger filter size with more surface area to lower the pressure drop. While you’re at it, oversizing the return drop or plenum doesn’t hurt.
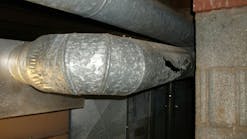
Many installations need more than air filter improvement to solve fan failure errors. You’ll need to look at the supply and return duct trunks. A simple way to locate restrictions is by measuring pressures across duct fittings or every four feet down the trunk. Look for the highest change in pressure because it’s probably the location of the airflow restriction. Common corrections include using less restrictive fittings, increasing duct sizes, or adding extra return or supply ducts.
There are some duct systems where the issues are not in the trunk but in the branch ducts. Often, simple improvements such as removing kinks, improving suspension, or removing excess flex duct and extra elbows make a big difference. However, some branch duct sizes must be increased starting at the takeoffs. You can also decrease resistance to airflow by choosing performance-grade supply registers and return grilles with low-pressure drops.
Email me for NCI’s Duct Sizing Tables and Quick Duct Capacity Check for more information about quick and simple retrofit duct sizing: ncilink.com/ContactMe.
Preventing Fan Failure Errors
Most installations suffering from fan failure errors will need additional duct repairs you didn’t include in the pricing. This situation can put you in a bad spot with the customer. So, how can you ensure you don’t inherit a flawed duct system in the future?
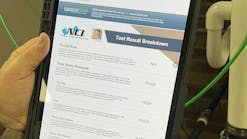
Start by measuring static pressure and fan airflow before you quote variable-capacity equipment. The best way I’ve seen to do this in retrofit situations is with a Digital TrueFlow Grid from The Energy Conservatory. This way, you can make any issues you find known to the homeowner before you own them. The TrueFlow app generates a report proving whether an existing duct system is acceptable or needs further work.
Most homeowners don’t know that older equipment tolerates poor duct systems. Newer equipment is more precise and has much tighter operating tolerances. It simply can’t handle poorly installed or undersized ducts. With some testing and planning, you can ensure you don’t get stuck guessing how to fix a fan failure error. If you have a problem with your job, I hope this article guides you in resolving the issue.
David Richardson serves the HVAC industry as vice president of training for National Comfort Institute, Inc. (NCI). NCI specializes in training focusing on improving, measuring, and verifying HVAC and building performance.
If you’re an HVAC contractor or technician interested in learning more about diagnosing and solving duct system problems, contact David at ncilink.com/ContactMe. NCI’s website, www.nationalcomfortinstitute.com, is full of free information to help you improve your professionalism and strengthen your company.


